Miraculously, our friends found the “270° Oias View” house, a property with a stunning, panoramic view overlooking the Caldera and village of Oia, available for our time in Santorini. We were delighted to find the home exactly as pictured and the views even more breathtaking than described on HomeAway. After an unexpected fiasco after booking the property, that is…
As an aside, my number one recommendation when booking a home via any site like VRBO, HomeAway, Airbnb, etc. is to get the insurance. Like us, you’ll be so glad you did if something goes wrong. In our case, the owner’s account was hacked, so we got scammed and our money went to an imposter posing as the property owner. Oy vey. It was not a promising start. But with the insurance and several phone calls, we were fortunately refunded by HomeAway, connected with the real owner, and everything after that was a complete dream!
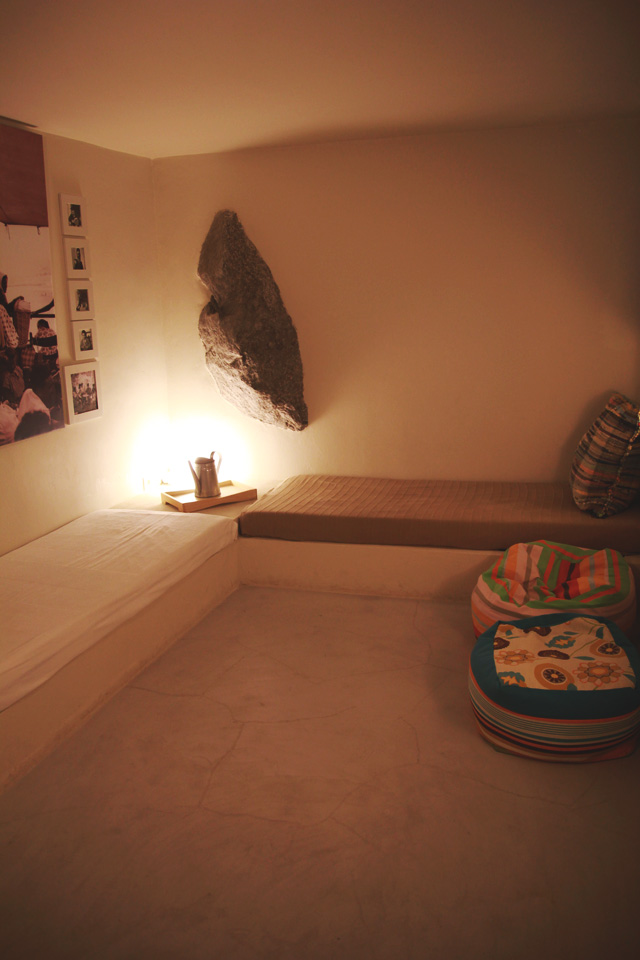
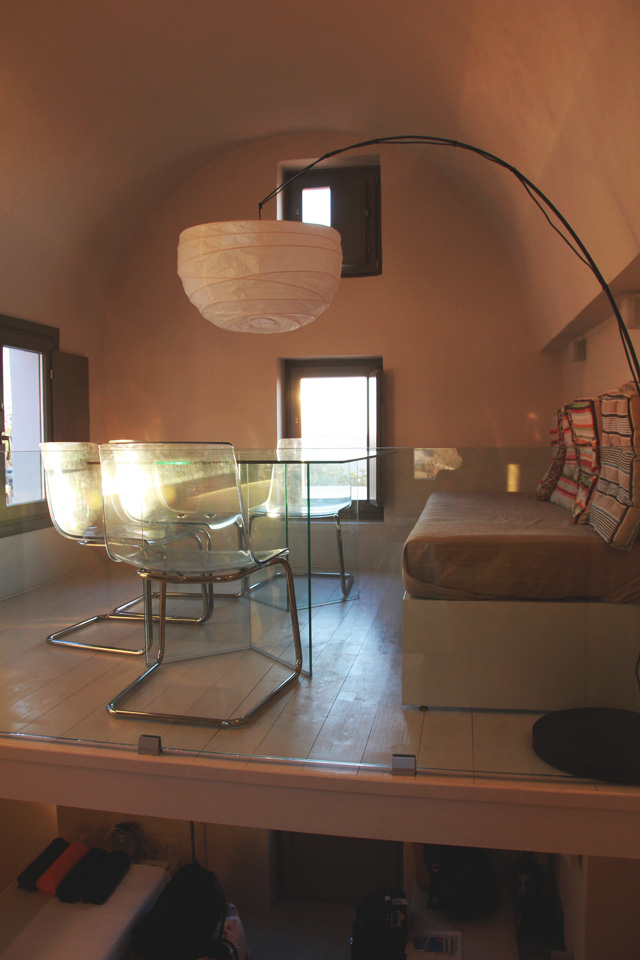
Manos, the architect and owner of the property, designed the complex of four houses to meld into the natural landscape. The minimalist aesthetic inside provided a pitch-perfect balance to our private swimming pool and sweeping views of land, sky and sea outside. And while the interior was almost cave-like, built into the hillside, it felt plenty spacious for 4 people. We had living space, large bedrooms and baths, and a fully equipped kitchen. But then again, it was really all about that pool and those views, especially at sunset!
Location-wise, we were just an easy walk away from the restaurants and shops of Oia and perfectly located for exploring other parts of the island by car. Manos’ staff was a huge resource and gave us their personal recommendations on the best restaurants (even including what dishes to order) and best beaches, coordinated our car rental and airport transportation, and even helped us book a sunset sail.
If you ever make it to Santorini, which I hope you do, I highly recommend seeing if one of the 270 Oias View properties is available. I could go back and stay there a full week, with my days spent simply–lounging outside with a glass of Santorini rose wine and a good book, taking the occasional dip in the pool, watching the sunset, then strolling just down the block to the local taverna in Finikia for dinner. And repeating it all again.
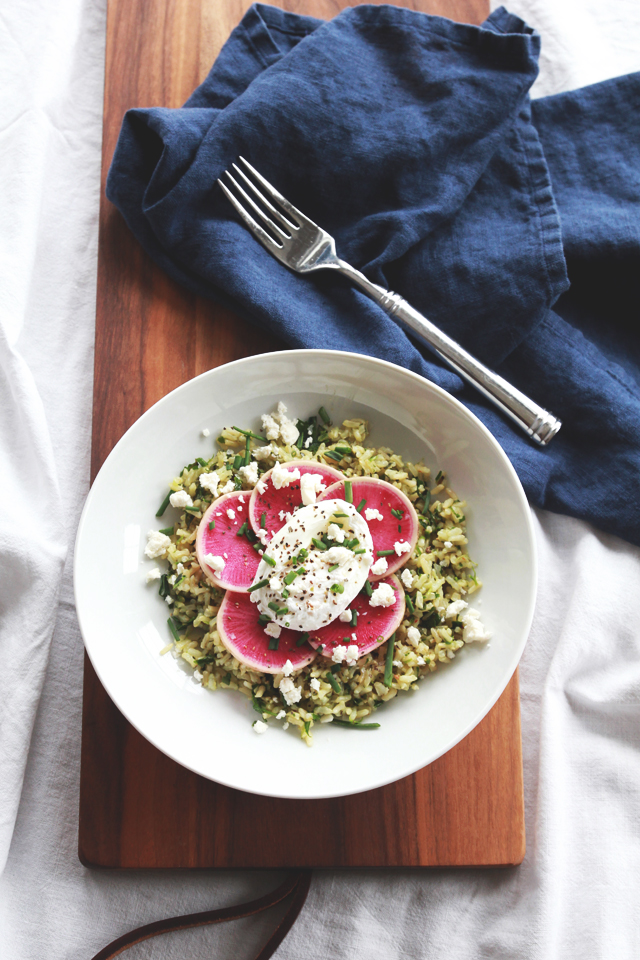
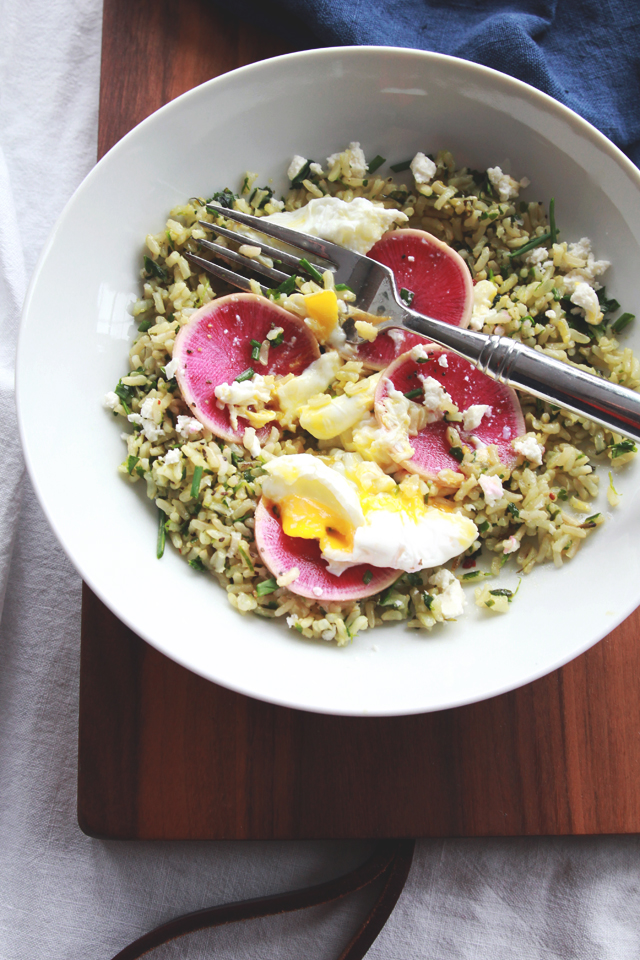
Keeping my eyes open means I never know when or where inspiration might strike. For recipes, I often get a creative spark at the farmers’ market or during a great restaurant meal. But in the case of this hearty and healthy dish I shared on Made By Girl this week, it all started with an Instagram photo. That’s right! Someone’s brunch at a restaurant across the country (in LA) looked so good in my feed that I made a few mental notes on ingredients and pieced together what I assume the original might taste like. And it’s delicious! Perfect for cozy weekend mornings. I used my favorite watermelon radishes–how gorgeous are their bright pink centers?–but you can sub regular radishes for the same peppery taste and crunch.
Herbed Rice Bowl with Poached Egg & Watermelon Radishes
2 cups of cooked brown rice
1 cup fresh herbs (parsley, mint, cilantro)
Extra virgin olive oil
Crushed red pepper flakes
Kosher sea salt and freshly ground black pepper
Lemon juice
1 large watermelon radish or 2 regular radishes, sliced thinly on a mandoline
2 eggs
Fresh chives, chopped
Fresh feta cheese, crumbled
Place herbs in a small food processor. Drizzle with olive oil and sprinkle with salt. Puree into a thick pesto, adding more oil if necessary to combine. In a bowl, combine the warm rice and the herb pesto. Mix well with a spoon to evenly coat the rice with the pesto. Season with red pepper flakes, salt, black pepper and a quick squeeze of lemon juice.
In a small pot, bring water to a boil then reduce heat to simmer and add a splash or two of vinegar. Crack each egg, one at a time, into a small bowl then gently slide the egg into the pot. Cook for about 2-3 minutes, then carefully scoop the eggs out with a slotted spoon. Divide the rice between two bowls. Top each with the radish slices, then a poached egg. Sprinkle with the chives, feta, salt and pepper.
I associate certain colors with certain seasons—do you? I find myself shifting the clothing I gravitate toward accordingly. I’m kind of predictable, really. Springtime is for shades of light green, sunny yellow, and soft pastels. Summer for bright white, cobalt blue, magenta, and pops of red. Winter I pretty much go dark and wear lots of black. And fall is for wine, pine, cozy cream, indigo and coppery hues—as evidenced by this casual look I tossed on the other day. This winter though, my goal is going to be to remove colors from their typical, seasonal boundaries and have a little fun. Like a bright, cotton-candy pink sweater or a bold blue beanie in the winter! I think wearing cheerful colors can really brighten up your mood, especially when it’s gloomy outside–that’s my plan.
I shared two outfit ideas on Channeling Contessa earlier this week to prove that you don’t have to sacrifice style to show your team spirit. It’s as easy as ditching the baggy team gear (sweatshirts, unfitted tees and the like) for a baseball cap. With a little styling, the result is a tomboy chic look for game day or weekend errands that’s anything but frumpy. So with football season in full force, I hope you’ll get inspired to root on your favorite team and look good doing it! I, for one, will be leveraging this concept as we head south this weekend to cheer on our alma mater, Mizzou, and the Cardinals at the World Series. Full looks after the jump, and read more about each outfit here!
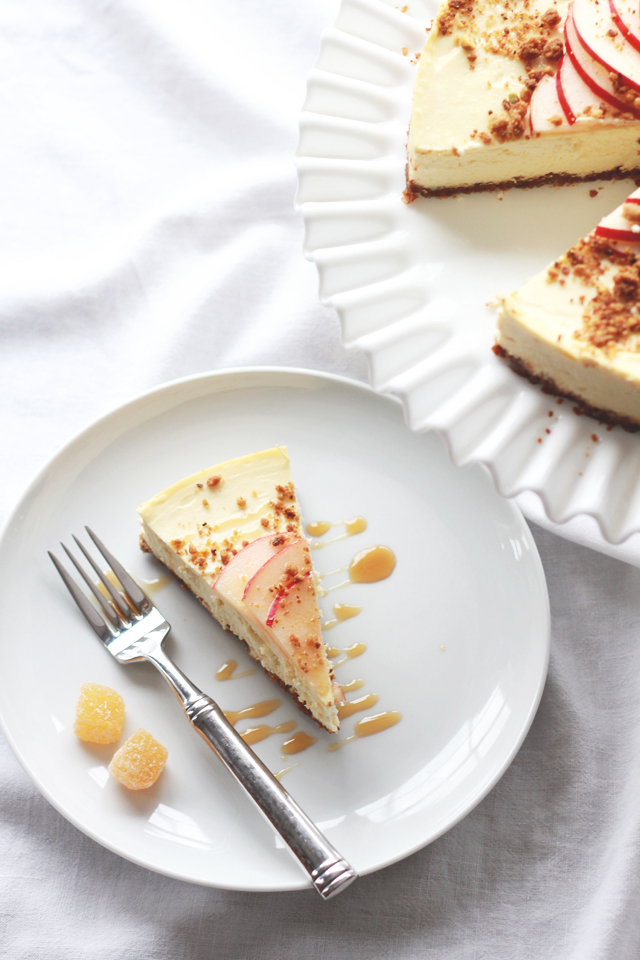
This month I teamed up with my friend Elizabeth to share another sweet treat for our One Last Bite series. As usual, she hit it out of the park–this is exactly why I eat healthy so I can enjoy decadent, seasonally inspired desserts like this without guilt. Keep reading for her inspiration and the recipe for one of the best cheesecakes I’ve ever had!
There’s no denying it—knee-high socks weather has arrived and you can’t go anywhere without seeing a billion pumpkin-flavored foods. Pumpkin lattes, pumpkin doughnuts, pumpkin cream cheese, pumpkin soup, and even pumpkin beer. Since when did pumpkin become the be-all and end-all of fall cuisine? Has everyone forgotten about the many other wonderful flavors of the season? When I feel the first hint of chill in the air, I want the spice of ginger snaps. I want cinnamon toast with a thin smear of goat cheese and pear jam. I want warm roasted spiced nuts wrapped in a paper cone.
This recipe brings together all of my favorite fall flavors—along with a surprise or two. The creamy goat cheese in this cheesecake provides the slightest tang, which balances well with the sweetness of the pears and the hint of burnt-sugar from the agave nectar drizzle. For the crust, I highly recommend Trader Joe’s Triple Ginger Snaps, which contain bits of spicy candied ginger. And the pistachio crumble adds depth of flavor and a pleasant crunch. Step aside pumpkin-flavored everything. This is how fall is supposed to taste. Enjoy!
Goat Cheese and Gingersnap Cheesecake with Pistachio Crumble
Agave nectar
Anjou pear, sliced thin (drizzled with lemon juice to prevent browning)
Pistachio crumble (recipe follows)
Preheat oven to 350˚ F. In a mixing bowl, combine crumbs and butter and stir until fully incorporated. Line an 8” cake pan with parchment paper and very lightly grease pan. Add crust mixture and press evenly into the bottom of the pan. Set aside.
Place goat cheese, cream cheese and sugar into a mixing bowl and beat with an electric or stand mixer until well combined. Scrape down sides of bowl an add yogurt until just combined. With beaters running add eggs, one at a time, until fully incorporated. Stir in vanilla and beat until no lumps remain. Pour filling over crust and smooth the top with a rubber or angled spatula.
Place the cake pan in the middle of an empty roasting pan and place on the center rack of the oven. Slowly pour warm/hot water into the bottom of the roasting pan, being careful to avoid allowing any splashes or drips into the cake pan, until the water reaches halfway up the side of the cake pan. Bake cheesecake for 45 to 55 minutes or until center is still slightly wobbly.
Carefully remove the cake pan from the oven and the water bath and allow cheesecake to cool for 10 to 15 minutes. Run a knife along the edge of the pan to ensure cheesecake doesn’t stick to the sides. Allow cheesecake to cool for an hour. Place cheesecake in the refrigerator and allow to chill for at least 6 hours.
Once cheesecake has completely chilled, run a knife along the edge again. With a platter ready, place a clean plate or cake board over the top of the cheesecake and pan and quickly invert it. Tap the bottom of the cake pan to ensure nothing is sticking. Remove pan and replace with a platter before quickly and carefully turning the cheesecake onto the platter and removing the plate or cake board from the surface (the removal process should take no more than 30 seconds). Garnish with sliced pears, a drizzle of agave nectar, and pistachio crumble.
Pistachio crumble
1/2 cup salted, roasted pistachios
1 cup flour
1/2 cup butter, cut into small pieces
1/2 cup brown sugar
Preheat oven to 400˚ F. Place the pistachios in the bowl of a food processor. Pulse the food processor until the pistachios are coarsely chopped. Place the chopped pistachios in a bowl and set aside. Add flour, butter and brown sugar to the processor and pulse until it forms a crumble mixture that sticks together in large clumps. Add the chopped pistachios to the mixture and pulse the processor just until mixed.
Spread the mixture onto a baking sheet and bake for about 10 minutes or until it has browned, watching carefully to make sure it doesn’t burn. If the crumble near the outside edges of the pan seem to be baking more quickly than in the center, use a spatula to redistribute the crumble over the pan after it has baked for 5 minutes. Allow to cool on the pan. The crumble will become more crunchy once it has cooled completely.
Recipe by Elizabeth Ansfield / Photos by Lauren Craig
In between capturing photos of amazing scenery, historical places, the vibrant culture and cuisines of Greece and Turkey, we snapped some of my vacation style. While I brought along this dress and this one for nighttime, for day I packed a lot of versatile pieces that I could easily repeat or even mix and match for a different look. In particular, this black skirt and this lace dress (love this alternative) I wore on heavy repeat. I thought I’d round up all the outfits we captured in the hopes that they provide some inspiration for your own next warm-weather getaway!
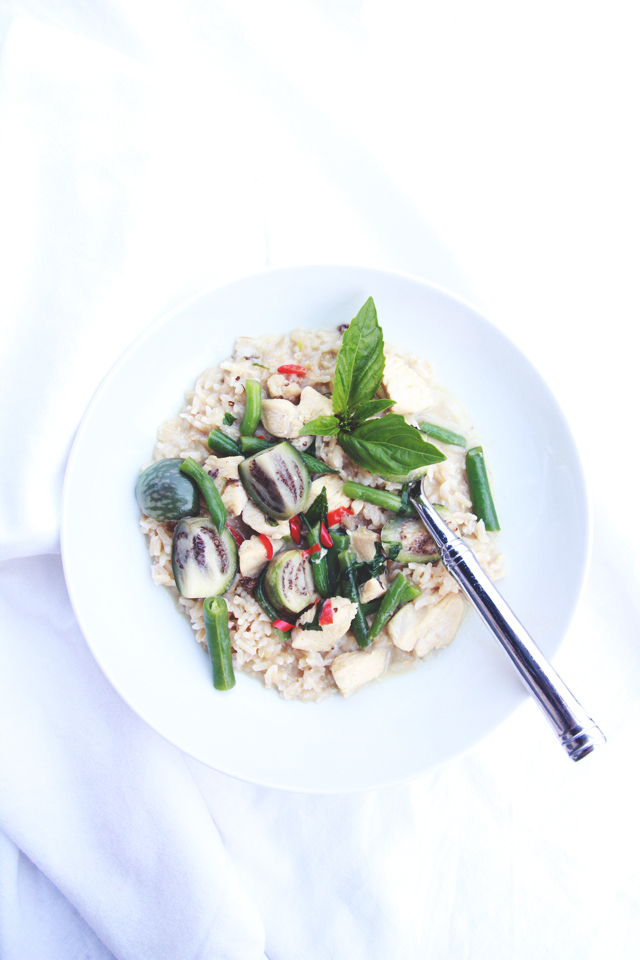
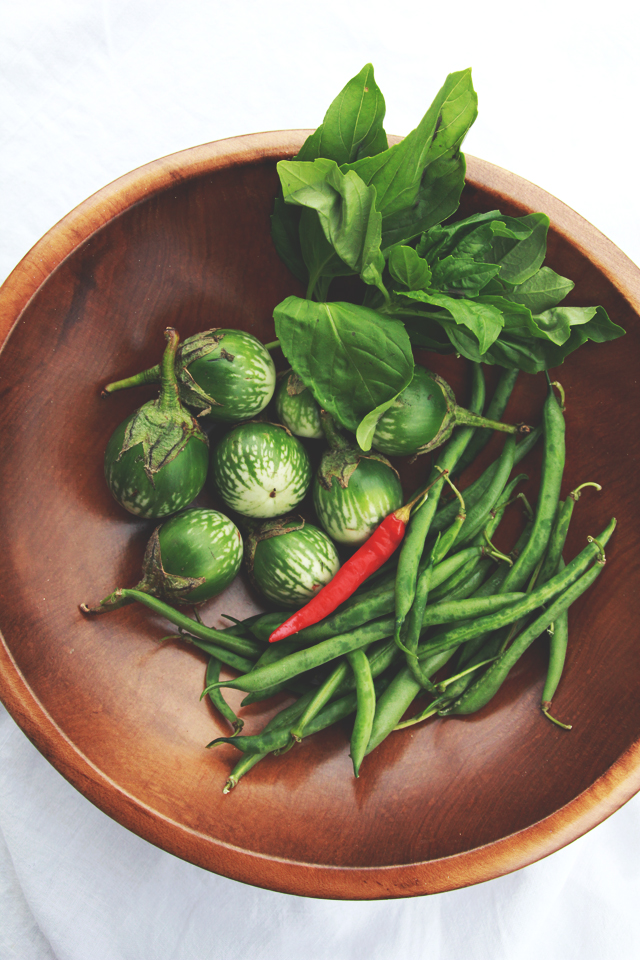
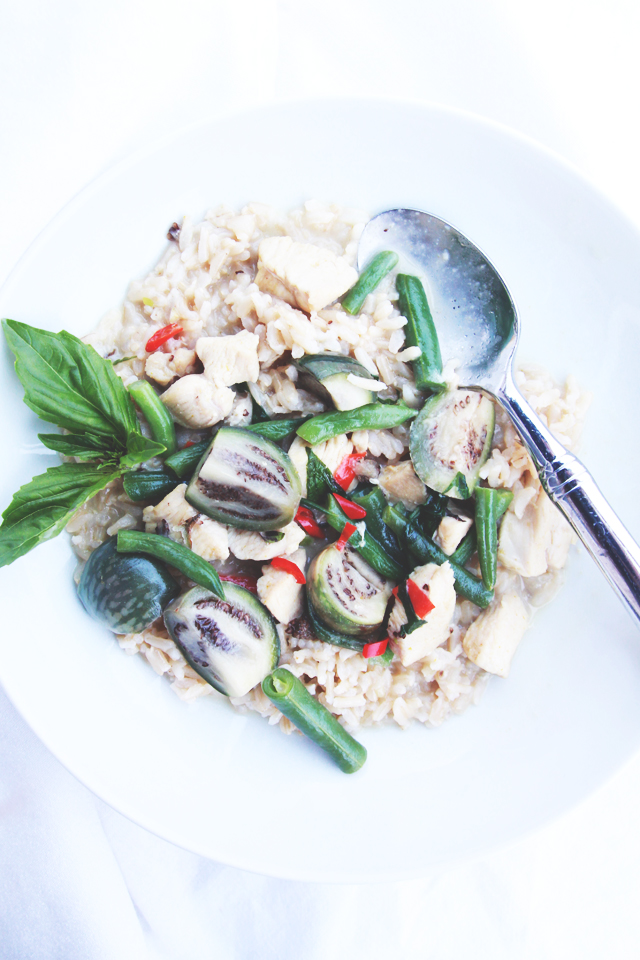
Second only to my love of cooking with seasonal and local ingredients is cooking international dishes. Taking a temporary pause from the Mediterranean-inspired meals we’ve been recreating since our recent travels (more recipes coming soon!), we took a trip down memory lane last week to make this green curry with chicken after finding Thai eggplants at the farmers’ market.
When we visited Chiang Mai, Thailand two years ago, one of the must-do experiences on my wishlist was to take a Thai cooking class. We loved Thai food, but always assumed it was too hard to cook. A class at Baan Thai, a family-run cooking school, changed our mind! Our instructor led our small class of six to the local market to learn about exotic fruits and vegetables, then taught us how to make five different dishes. One of those was a traditional green curry with chicken—we even learned how to make green curry paste! Keep reading for the surprisingly simple recipes…
2 chicken breasts, cut into cubes
1 tablespoon green curry paste
2 handfuls of Thai eggplants, quartered (or 1 Japanese eggplant, cubed)
2 handfuls of green beans (baby carrots or baby corn work too)
2 cups light coconut milk
10 leaves of sweet basil
2 kaffir lime leaves*
1 red spur chili, diced
2 tablespoons fish sauce
1 teaspoon sugar
3 tablespoons oil
2 cups of cooked sticky rice
To make the green curry paste, put garlic, green chilies and tumeric root into a mortar and pound well with a pestle. Add lemongrass, galangal, coriander root, kaffir lime peel and pound well. Add shallot, lesser ginger and pound. Add shrimp paste and pound until smooth and fine. The paste can be kept in a sealed glass jar in the refrigerator for up to 4 months.
Put the oil into a wok or large skillet over low heat. Add the green curry paste and stir until fragrant. Add the chicken, 1/2 cup of the coconut milk and stir constantly until the chicken is cooked. Add the remaining coconut milk and bring to a boil. Add eggplant and green beans, stirring occasionally. Season to taste with the fish sauce and sugar. Add the basil and kaffir lime leaves and red chili. To serve, add rice to shallow bowls and top with the curry mixture.
*Some of the Thai ingredients can be difficult to find unless you have access to a great Asian market. Try Temple of Thai, a great online resource that offers small quantities of all the fresh ingredients mentioned above that you can simply order. Easiest option: Use the jarred Thai Kitchen brand of green curry paste found in the Asian section of your grocery store–we’ve found it to be a great substitute in place of making your own.
Is your home a work in progress? Mine is! I think you refine your personal style over time, and my home is a total reflection of that evolution. I’ve been able to infuse one-of-a-kind character by collecting and mixing unique and classic pieces, moving things around, and even waiting to find the perfect X, Y or Z. While some rooms have been tweaked and added to, one room we did very little with to begin with was our office. We simply transferred existing furniture into the space from the last place we rented before buying our house. And it worked okay, so I focused on other areas and just let that room be. But we’ve long been itching to update the space to be one we actually love and use–and I’m super guilty of sitting on our living room couch with my laptop instead of at the desk. So I thought I’d bring you along as we redesign the space and share my process with you!
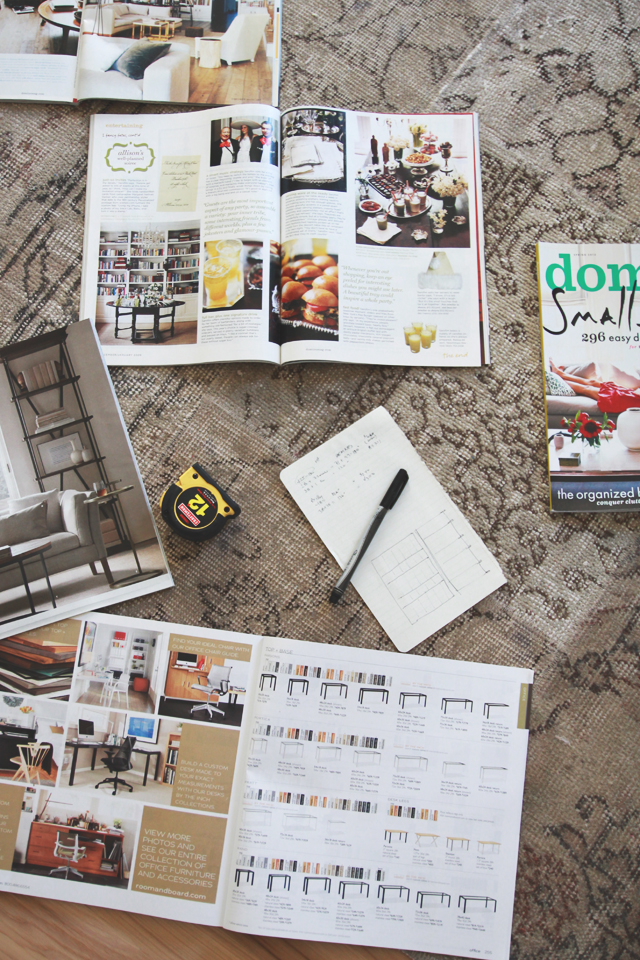
First things first, we’ve moved everything out of the room. Starting with a clean slate helps visualize all the options of where furniture could go versus where we had it. Then, I measure. Measuring the room helps immensely to actually know what will fit and what won’t. And those measurements have been informing every piece of furniture we look at online or anything we view in person (I always take a small tape measure with me). As we decide on furniture, we then use painter’s tape to map out dimensions on the floor.
My next step is my favorite: Gathering ideas and inspiration. While I love Pinterest as much as the next gal, I still like to tear out pages from magazines and pull out old issues I’ve saved and then lay it all out in front of me. I’m an extremely visual person and need to see all my ideas at once in order to figure out how to bring my vision to life. I never set out to outright copy another space, but instead take all the various sparks of inspiration, add my own instincts, and mix components in a unique way to reflect my personal style.
The last step in my process is to find a starting point. It might be a single piece of furniture or a gorgeous textile or rug, but usually my rooms start with one item and build from there. In the case of our office-turned-library, we knew we wanted a wall of bookshelves, two chairs or a small couch, and a desk. We also decided on a direction–light and bright, white and airy (a contrast to the dark and moody vibe of our dining room). But it was when we were in Turkey that we made our first exciting purchase–a Turkish rug! Pieced together from vintage rugs and overdyed to a warm neutral, we’re hoping it will anchor the room. We also carefully selected a few beautiful silk and velvet textiles, in bold but complementary colors and ikat and suzani prints, at the Grand Bazaar to turn into pillows. They will really pop against an all-white backdrop! These are the initial inspirations and unique starting points for the room, and then we’ll work from there!
You are currently browsing the Perpetually Chic blog archives for October, 2013.