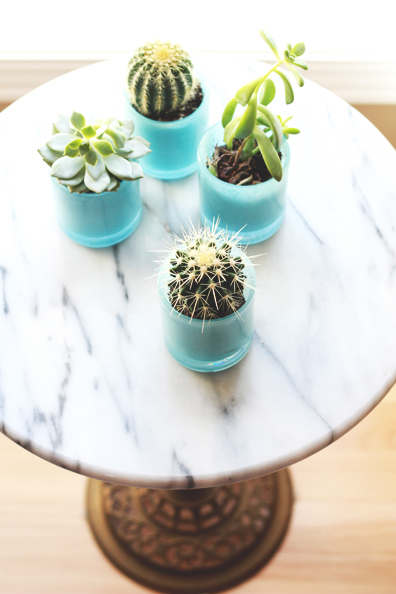
I kill indoor plants. But, I’m happy to report these succulents and cacti are still alive and well! I love the bit of constant greenery they provide inside my home, not to mention they require almost zero attention (a definite plus if you happen to have a black thumb). Do you keep plants or succulents in your home? Here are a few super simple tips for creating your own succulent “garden”…
Select a variety of succulents in different heights and shapes for some interest.
Choose several small vessels or just one larger one to cluster the plants together. Mine are actually glass votive holders from Pottery Barn, but I also love these neon mini planters I found on Etsy.
Fill the bottom of each cup or pot with soil, then press the plants in and pat additional soil on top.
Water the succulents sparingly, being careful not to over water them. Be sure to allow the soil to dry completely between waterings.
Place the succulents in a well-lighted area so they can soak up as much natural light as possible.
Succulents planted in tiny vessels also make great gifts for friends and family!
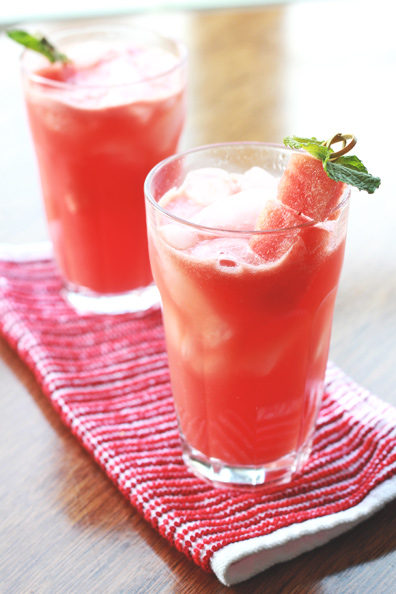
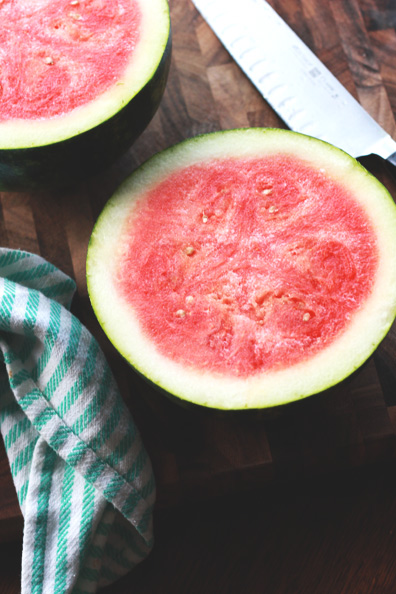
On a hot summer day, there’s nothing better than biting into a juicy, sweet watermelon. I wanted to turn that experience into a beverage for our summer barbecues, and so a family friendly recipe for watermelon punch was born. It’s the perfect summer drink, not to mention it would be incredibly simple to prepare in big batches for larger summer gatherings. Count this as my summer drink of choice!
Summertime Watermelon Punch
4 cups watermelon puree (from one seedless watermelon)
1 can or bottle of ginger ale
1/2 can of San Pellegrino Limonata
Juice of 1 large lime
1 tablespoon agave nectar
To puree the watermelon, blend your cut watermelon cubes on very high in your blender. Add watermelon puree, ginger ale, Limonata, lime juice and agave nectar into a large pitcher. Stir well to combine. Serve over ice and garnish with stir sticks threaded with frozen watermelon cubes and mint leaves.
If you’d like, you can easily turn this into a cocktail by adding vodka!
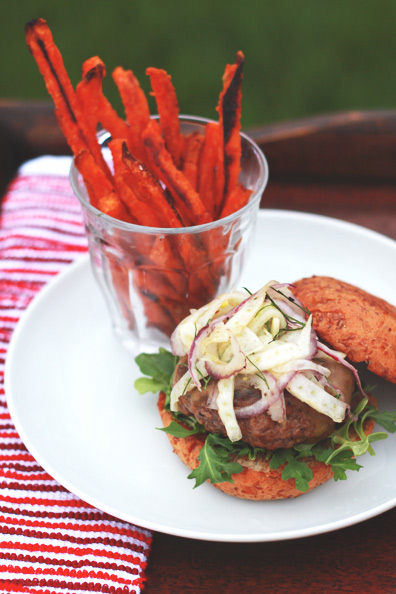
Summer is synonymous with hot weather, vacations, and backyard barbecues. While I’ve mentioned we like to mix up our grilling routine, sometimes a homemade cheeseburger and fries just hits the spot. To keep things from staying too ordinary, we’ve become experimental with our burger toppings. One of our favorite versions is to add thin slices of smoked gouda in the last minute of cooking the burgers, so the cheese melts right into the meat. Then we balance that smoky, cheesy flavor with a fresh and crisp fennel slaw piled on top. It’s such a good burger upgrade…consider it for your next grill out, perfect with watermelon punch.
Smoked Gouda Cheeseburgers with Fennel Slaw
Ground beef
Smoked gouda
Dijon mustard (substitute ketchup if you prefer)
Handful of arugula
Burger buns (we like sprouted grain buns)
For the slaw:
1/2 fennel bulb, top and bottom removed (some fennel fronds reserved)
1/2 small red onion
1 tablespoon of juice from an orange
A good drizzle of olive oil
Salt and pepper
Using a mandoline, slice half the fennel bulb into paper-thin strips. Place the shaved fennel into a small bowl. Do the same with the red onion: run the flat side down the mandoline to create thin strips. Add to the bowl. Add the orange juice, olive oil, salt and pepper to the bowl and toss with your hands. Add in a few of the fennel fronds. Let the fennel slaw sit while you prepare the burgers. Grill the burgers to your liking. At the very end of cooking, top each burger patty with a thin slice of smoked gouda (I also cut it on the mandoline). For each burger, layer Dijon mustard, a small amount of arugula, the gouda cheeseburger, then mound a handful of the fennel slaw on top.
There’s really no color combination as perpetually chic as black and white. No matter your hair color, no matter the season, it just always works. It’s a great fallback when you don’t want to stress about color or pattern pairings, but it can still be just as fun. So today I’m sharing three very different looks in this classic combo–for a wedding, work, and weekend. For each look, I started with a pretty J.Crew top in my closet, then added some old favorites to mix it up. Keep reading for the details on each look, and I hope you get some inspiration to wear your own black and whites this summer!
I traditionally wear dresses to weddings, but why not a sparkly top and skirt? I admittedly have a lot of striped tees in my closet, but when I spotted this sequined version on the sale rack in the winter, I knew it was a winner. Fancy stripes! This top pairs equally well with jeans for date night, but I kept things party ready with an old beaded skirt and metallic heels. I threw in my favorite clutch for a less formal pop of cobalt and a beaded necklace to coordinate, keeping silver in the mix.
For work, I paired a printed silk blouse with a flowy linen skirt in an always-appropriate longer length. Like the wedding look, I wanted to give it a little hit of color, which is where the coral wedges come in. Wedges have been a work favorite of mine this summer–I’ve been rotating wearing a few pairs, since they’re so much more comfortable than heels! My Madewell tote is another workday staple–a classic that’s perfect for traveling, too.
I picked up this top during one of J.Crew’s 25% off sales, and I’m so glad I did. It’s a little splurge, but I adore the airy linen and pom-pom detailing around the neck and sleeves. It works for work just as well as it works with denim on the weekend. I especially like it with white bottoms–shorts or jeans–for an effortless, all-white look that really lets the embellishment pop.
It might surprise some people that I don’t make my bed. There was a time where I thought that maybe having a habitually messy bed was something I should work to change. But honestly, habits are habits. And if I didn’t pick up the routine—despite all those years growing up where making my bed was an expectation—I’m certainly resistant to pick it up now. So unless we have friends coming over, because tidying up when guests are visiting is always appropriate, this is how our bedroom looks each morning when we leave—and each night when we return.
I have to admit I’ve long quit stressing about this fact. And really, when I stop to look around, there’s something I actually love about it…the natural light pouring through the windows in the morning, the serenity that our dark gray walls impart any time of day, and below, the twisted sheets a sign of a good night’s sleep. It just feels very comfortable.
The imperfection of my unmade bed seems to speak for itself: There are some things just not worth worrying about today, some things that just won’t be perfect. And that’s okay. That’s my take, anyway. Maybe your made-up bed speaks something else: I’ve got it together, I’m tackling my day from the moment I roll out of bed. Neither way is right or wrong. But maybe it does say a little something about our personalities, without us even realizing it. So which is your style—the unmade or made bed?
I’ve teamed up with my friend Elizabeth to bring you a new dessert in our One Last Bite series, and this one’s perfect for the first of your many summer soirees. Read on for one of her favorite, easy recipes!
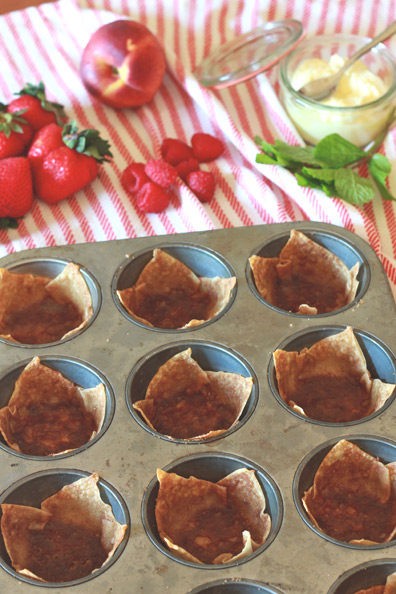
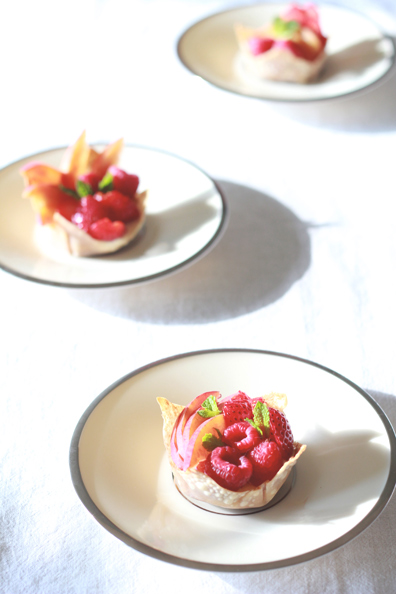
The perfect party recipe is one that requires little prep work and won’t keep you in the kitchen once your guests arrive. These honeyed mascarpone & berry shells are my go-to summer dessert for both well-planned and last-minute gatherings. You can prepare and bake the shells in just 20 minutes, and cut up whatever fruit you have in the fridge. Once the dinner dishes are cleared, each shell takes just a few moments to assemble. To make things even easier for you as the host, set up a build-your-own dessert bar, and let guests fill the shells any way they please. Have some fun by putting out some additional toppings–toasted coconut, sliced almonds, candied ginger–whatever you have in your pantry! Keep reading for the recipe…
Honey Mascarpone & Berry Shells
12 wonton wrappers
2 Tablespoons butter, melted
1/3 cup firmly packed brown sugar
1 teaspoon cinnamon
3 cups assorted berries and other chopped fruits of your choice
6 ounces (3/4 cup) mascarpone cheese or whipped cream cheese
2 Tablespoons honey or agave nectar
2+ teaspoons Grand Marnier or orange juice, to taste
Fresh mint leaves
Lemon zest (optional)
Preheat oven to 325 degrees. Butter a 12-cup muffin tin. Spread out wonton wrappers on waxed paper. Evenly brush the top of each wonton with melted butter. In a small bowl, combine the brown sugar and cinnamon. Sprinkle about one teaspoon onto each wonton, and smooth the sugar layer with the back of a spoon to help it adhere to the butter. Carefully place each wonton in the muffin tin with the sugar layer facing up, gently pressing to form a cup. Bake 8-10 minutes, or until the wontons are crisp and golden brown. Remove baked shells from the pan and cool on a wire rack. If not serving immediately, place shells in a airtight container. They will keep for a few days.
Just before your guests arrive, wash and prepare the fruit, chopping large berries and other fruits. Keep chilled until you’re ready to serve. In a small bowl, combine mascarpone, honey, orange juice or liqueur, and lemon zest, if using. Keep chilled, and stir before serving. Spoon a teaspoon of honeyed mascarpone into each cup, and top with fruit and mint–or let your guests build their own!
Outfit details: Madewell top and shorts, Loeffler Randall sandals (on sale here and here!), Ray-Ban sunglasses
I’m ushering in the summer season over on Channeling Contessa today with a casual but pulled-together outfit perfect for backyard barbecues. These are just a few of my favorite images, so be sure to hop on over to see the full details of my summery look, plus recipe tips!
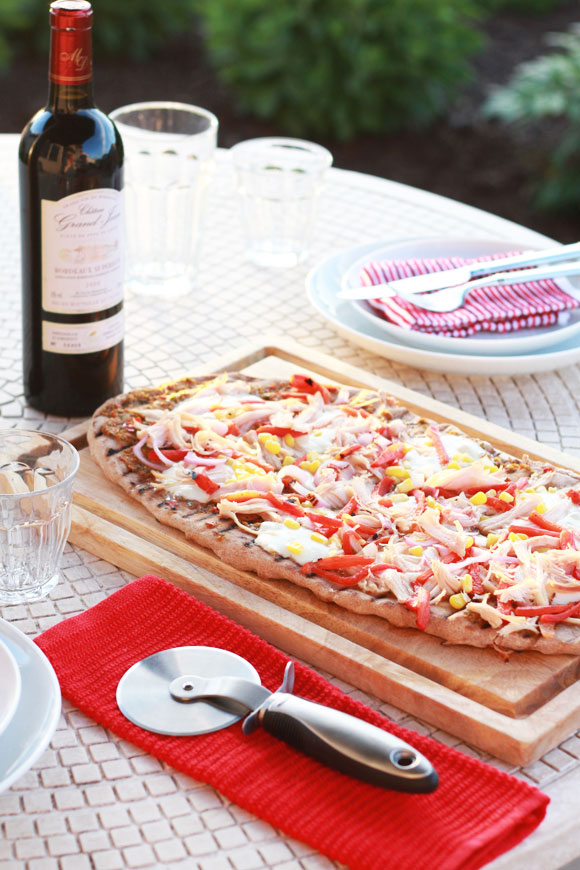
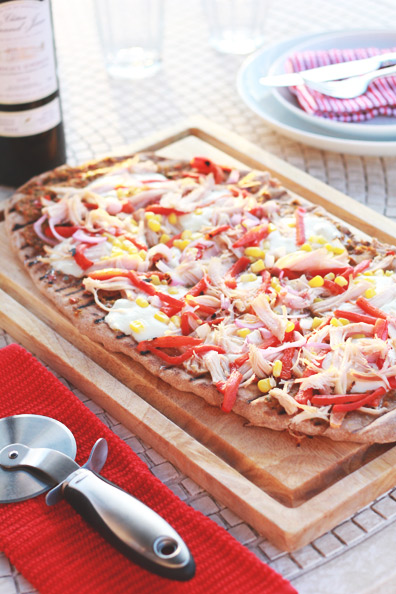
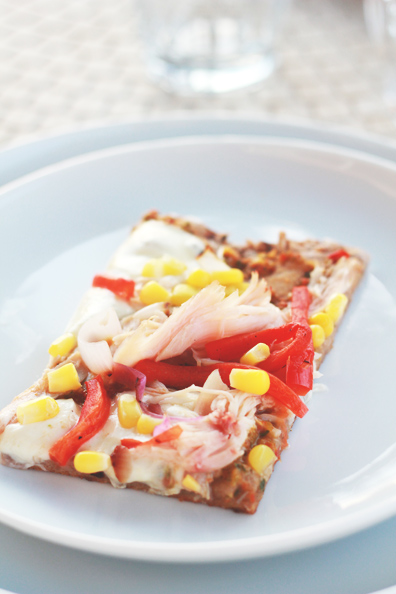
There’s nothing like summer nights. As much as possible, we plan both weekend and weeknight meals that can be grilled, so we can relax outdoors in the evening. One of our favorites is to grill unique pizzas–either personal sized or large ones that can be shared. Last night we decided to make use of a large smoked chicken we picked up at the farmers’ market on Saturday, shredding up a bit as a pizza topping. Smoked chicken seemed to call for something a little less ordinary than your standard tomato sauce, so we whipped together a quick poblano pepper sauce for a spicy, flavorful base. Then we finished our pizza off with chunks of fresh mozzarella, strips of roasted red pepper, grilled red onions, and a sprinkle of corn. It was different and SO delicious! Keep reading for the recipe, and I’d love to hear – what are your favorite pizza toppings?
Smoked Chicken Pizza with Poblano Pepper Sauce
1 poblano pepper
1/3 red bell pepper
3 cloves garlic, peeled
1 roma tomato, diced
1 tablespoon parsley
1-2 tablespoons of olive oil
Salt and pepper
For the pizza:
1 pound whole wheat pizza dough (we used Trader Joe’s)
Flour for dusting
1 cup smoked chicken, shredded (we bought ours at the farmers’ market, but you can also smoke your own or sub cooked chicken breasts)
2/3 red bell pepper
2 large balls of fresh mozzarella packed in water, drained and sliced into rounds
1/2 cup frozen corn, thawed
1/3 red onion, sliced thinly
Set out the pizza dough at room temp for 20 minutes. Meanwhile, roast the poblano and red pepper directly over gas flames on the stovetop (or under a broiler). Turn until charred all over. Let cool, then peel off their charred skin and remove seeds and core. Thinly slice the red pepper into strips and coarsely chop the poblano. In a food processor, puree the poblano and 1/3 of the red pepper with garlic, tomato, parsley and olive oil. Season with salt and pepper. Transfer the sauce to a bowl and set aside.
Heat a grill to high heat. On a lightly floured cutting board or countertop, roll the pizza dough into a ball. Flatten, dust with more flour and roll/stretch the dough into approximately 12-inches wide. You can attempt to make it round, but I just let mine go into whatever shape happens. Transfer the dough onto a large rimless baking sheet, brushed with olive oil. Brush the top of the dough with oil.
Carefully transfer the dough from the baking sheet onto the grill. You may need an extra set of hands here. Grill just a minute or two, until the top side of the dough begins to bubble and the bottom side has char marks. Carefully slide the dough back onto the baking sheet. Flip the dough so the grilled side is up, then spread a light layer of the poblano pepper sauce over the dough, leaving a 1/2 inch border around the edges. Evenly disperse the rounds of fresh mozzarella around the pizza, then scatter the chicken, red pepper strips, red onion and corn all over. Slide the pizza back onto the grill just another few minutes until the bottom is browned and the cheese is melted on top. Transfer to a cutting board and cut with a pizza wheel.
You are currently browsing the Perpetually Chic blog archives for June, 2013.